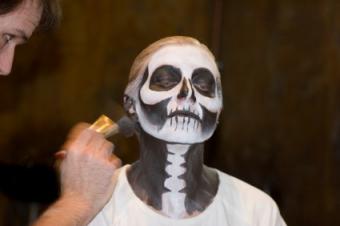
For a classic and easy Halloween look, learn the basic techniques behind skeleton face painting.
Skeleton Makeup Supplies
Dressing as a skeleton for Halloween is an economical choice, especially in terms of makeup. The color palette is simple: white, black, and optional gray for contouring. A brush is helpful for applying the makeup, but your fingers or a sponge work best for blending and contouring. A black eyeliner pencil is also useful for laying out the bone pattern and defining specific features such as teeth.
Steps to Apply Skeleton Makeup

Begin with clean, dry skin. If your skin is oily, blot it first with a cotton ball dipped in astringent. Cover the majority of your face with white base makeup, except for the area around your eyes and the tip of your nose. Do not cover ears-which skeletons don't have-and stop at your jaw line to define this element of the skull.
Next, fill in your eye area to create the hollow for the skeleton's eye sockets. Since skeletons also lack noses, which are made of cartilage like ears, shade the tip of your nose black, leaving just the top of the bridge white.
Use gray makeup to contour around your cheekbones and under the "eye sockets" for a more realistic look. The goal is to make the fleshy parts of your face appear to recede.
Now comes the question of how to represent your teeth. As a skeleton, you no longer have lips and gums, so tooth root structures will be visible. There are several ways to represent skeleton teeth. The simplest way is to draw short horizontal lines about an inch past each corner of your lips. Then draw vertical lines all the way across. If you have the extra time and some artistic skill, shade around each individual tooth.


If your neck will be exposed, then paint it black except for the center portion. Use white and gray paint to sculpt your vertebrae. However, this extra step can be avoided by wearing a hooded cape with a black turtleneck beneath it. The same conundrum can be avoided with the ears by wearing a cape, but if they will be exposed, paint them black if you have dark hair.
Special Effects
You created the basic skeleton face, but you want to take it a step further. There are a few special effects that can bump your "scare factor" up a notch or two. Use green or yellow face paint to make your "bones" seem more realistic. Add yellow stains to the teeth and blend olive green around the edges of your eyes and nose to simulate moss or decay.
Although skeletons obviously don't have blood, you can add some fake blood just for the shock effect. Drip it from the corners of your painted-on teeth and around the hollows of your eyes.
Another option is to paint only a partial skeleton on your face. Paint the upper half and leave the jaw off, or just paint one side of your face to make it appear that the skin was ripped away. Apply plenty of fake blood as well as some liquid latex to simulate ripped flesh.
Where to Buy Skeleton Face Painting Kits
Final Tips
Be sure to use face paint that is safe for the skin and non-toxic, and avoid getting any directly in your eyes. To help your skeleton face painting last and prevent it from sweating off throughout the evening, lightly blot face with a large makeup brush dipped in baby powder. Cover your face first with a tissue to avoid dulling the black paint; the powder will still filter through enough to set the makeup.


